Building Lists and Navigation 예제 정리
이전에 만든 Landmarks 앱에서 랜드마크 리스트와 각각의 위치를 보여주는 디테일 뷰를 추가해 볼 것이다.
각 랜드마크의 정보를 보여주는 뷰를 만들고 랜드마크를 보여주는 detail view를 볼 수 있는 scroll 가능한 리스트를 동적으로 만들어 볼 것이다. UI를 위해, 사이즈가 다른 device 들을 다수의 preview로 볼 것이다.
지금 보니 애플이 다운받으라는 프로젝트를 다운받아도 쓸건 이미지 밖에 없는 것 같다. 완성하면 나중에 지워도 될 것 같다,
*참고 예제 : developer.apple.com/tutorials/swiftui/building-lists-and-navigation
위 예제를 보면서 진행해주세요 :)
Section 1
Create a Landmark Model
In the first tutorial, you hard-coded information into all of your custom views. Here, you’ll create a model to store data that you can pass into your views.
Use the completed project from the previous tutorial and the resources available from this tutorial’s project files to get started.
-> 첫 번째 튜토리얼에서, 모든 커스텀 뷰들에 대해서 정보들을 직접 입력했다. 여기선 view들에 전달할 데이터를 저장하는 모델을 만들어보자.
완성된 이전의 프로젝트를 사용하고 이번 프로젝트 시작하기에 있는 사용가능한 소스들을 사용하라.
Step 1
Drag landmarkData.json in the downloaded files’ Resources folder into your project’s navigation pane; in the dialog that appears, select “Copy items if needed” and the Landmarks target, and then click Finish.
You’ll use this sample data throughout the remainder of this tutorial, and for all that follow.
-> 다운로드 받은 프로젝트 파일들 중 Resources 폴더에서 이전에 완성한 Landmarks 프로젝트에 drag하라. 그러면 dialog가 뜰텐데, "Copy items if needed"과 Landmarks를 타겟으로 하고 finish를 클릭해라. 당신은 이 샘플 데이터는 튜토리얼의 전반에 걸쳐 사용하게 됩니다.
Step 2
Choose File > New > File to create a new Swift file in your project, and name it Landmark.swift.
-> File > New > File 을 클릭 후 Landmark라는 이름의 Swift 파일을 하나 만들어라.
Step 3
Define a Landmark structure with a few properties matching names of some of the keys in the landmarkData.json data file.
Adding Codable conformance makes it easier to load data into the structure from the data file, which you’ll do later in this section.
-> landmarkData.json 데이터 파일에 있는 key들의 이름에 맞추어 몇가지 property들을 가지고 있는 Landmark 구조체를 정의하라. 그리고 Section의 마지막에 실행 할 데이터 파일에서 구조체로 데이터를 더 쉽게 로딩하기 위해 Codable을 채택하라.
Step 4
Drag the JPG files from the project files’ Resources folder into your project’s asset catalog. Xcode creates a new image set for each image.
The new images join the one for Turtle Rock that you added in the previous tutorial.
-> Resource 폴더에 있는 JPG 파일들을 당신의 프로젝트의 asset catalog에 드래그해라. XCode는 각 이미지에 맞는 새로운 이미지 집합을 만든다.
새로운 이미지들은 이전 튜토리얼에서 추가했던 Turtle Rock과 결합된다
Step 5
Add an imageName property to read the name of the image from the data, and a computed image property that loads an image from the asset catalog.
You make the property private because users of the Landmarks structure care only about the image itself.
-> 데이터로 부터 이미지의 이름을 읽기 위해 imageName property와 asset catalog로 부터 이미지를 로드할 image computed property를 추가하라.
Landmarks 구조체는 오직 image property를 위해서만 사용할 것이기 때문에 private으로 property를 만들어준다.
*private과 같이 앞에 붙어 접근을 제어하는 것을 "접근제어자(=Access Control)" 이라고 부른다
*private은 특정 객체에서만 사용할 수 있도록 제어하는 가장 제한적인 제어자이다.
| Next, you’ll manage information about the landmark’s location. -> 이제 위치 정보를 관리할 것이다 |
Step 6
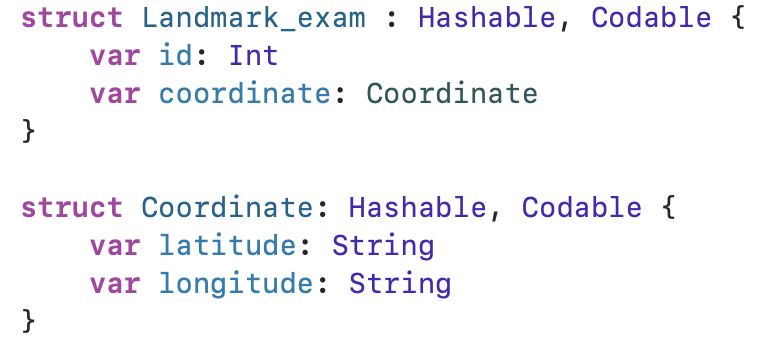
Add a coordinates property to the structure using a nested Coordinates type that reflects the storage in the JSON data structure.
You mark this property as private because you’ll use it only to create a public computed property in the next step.
-> JSON data에 있는 저장된 값을 반영할 Coordinates을 사용하여 Landmarks 구조체 내부에 coordinates property를 추가하라.
우린 이 coordinate property를 오직 다음 step에 나올 public computed property를 생성하기 위해서 사용할 것이기에 이 property도 private으로 설정해주어야 한다.
*참고 : coordinate system은 "좌표계"를 의미한다. 필자는 처음 시작할 때 매우 헷갈렸기에 혹시 몰라 적어본다 ㅎㅎ 그리고 latitude는 위도 longitude는 경도를 나타낸다.
*TMI : 필자는 기존 Swift에서 데이터 통신을 시도할 때 위 Step 6처럼 구조체 내부에 구조체를 넣는 방식이 아니라 구조체 외부에 구조체를 만들어서 type을 자료형으로 가지도록 했다. 근데 이렇게 보니 상관 없는 듯 하다 ㅋㅋ 편한대로 하면 좋을 것 같다.
예시
Step 7
Compute a locationCoordinate property that’s useful for interacting with the MapKit framework.
-> MapKit 프레임워크와 상호작용이 유용한 locationCoordinate property를 계산하라
|
Finally, you’ll create an array initialized with landmarks from a file. -> 마지막으로, 파일의 landmarks로 초기화 되어있는 배열을 만들어보자 |
Step 8
Create a new Swift file in your project and name it ModelData.swift.
-> ModelData라는 이름의 Swift 파일을 새로 생성하라
Step 9
Create a load(_:) method that fetches JSON data with a given name from the app’s main bundle.
The load method relies on the return type’s conformance to the Codable protocol.
-> 앱의 main bunle에 있는 JSON 파일에서 JSON data를 가져오기 위한 method인 "load(_:)"를 생성하라
load 메소드는 return type의 Codable 프로토콜 준수 여부에 따라 달라진다. (=이 말은 return 형이 codable 프로토콜을 준수 했느냐 안했느냐에 따라 메소드가 변경될 수 있음을 뜻하는 것 같다)
☆여기서 잠깐!☆
아마 처음 하시는 분은 멘탈이 나갔을거다. parse? Decodable? Bundle? 함수이름 옆에 <T:Decodable>? 리턴 형이 T? Data 타입이면 어떻게 생겼지? do? catch? try? JSON? Decoder? 온갖 생각이 다 들것이다.
그래서 아주 약간의 이해를 도울 정도만 작성하고 넘어가고자 한다.
1. Bundle : naviation pane에 보이는 폴더들을 Bundle이라고 생각하면 편하다. (정확한 개념은 아니고 일단 이렇게 이해하고 나중에 찾아봐라)
2. JSON은 데이터 형식이다. 구글에 JSON을 치면 자료가 많이 나온다.
3. 데이터를 가져오려면 Decoding이라는 작업을 해야한다. 이것을 실행시켜주는 것이 Decoder인데 우리는 json 형식의 데이터를 가져오니 JSONDecoder를 사용하여 decode를 실행한다.
4. decoding은 데이터를 컴퓨터가 이해할 수 있도록 코드로 변환해주는 것이다. (Encoding이라는 것도 있는데 이건 코드를 데이터로 변환하는 과정이라고 생각하면 된다.)
5. do catch는 에러가 발생하였을때 그것을 handling 하는 문법이다. (이건 필요없다)
1~4번까지의 내용을 통하면 우린 Bundle에 있는 JSON 파일 내부의 데이터를 디코딩 하는 load(_:)라는 함수를 만든 것이다.
Step 10
Create an array of landmarks that you initialize from landmarkData.json.
-> landmarkData.json에서 가져온 데이터로 초기화 시킨 landmarks 배열을 생성하라
|
Before moving on, group related files together to make it easier to manage your growing project. -> 계속 진행하기 전, 프로젝트가 더 커지면서 불어나는 파일들을 관리하기 쉽게 연관 파일들은 group으로 묶어라 |
Step 11
Put ContentView.swift, CircleImage.swift, and MapView.swift into a Views group, landmarkData.json in a Resources group, and Landmark.swift and ModelData.swift into a Model group.
-> ContentView.swift, CircleImage.swift, MapView.swift 파일을 Views group으로 묶고 landmarkData.json 파일은 Resources group으로 묶고 Landmark.swift와 ModelData.swift는 Model group으로 묶어라
Tip
You can create groups of existing items by selecting the items to add to the group, and then choosing File > New > Group from Selection in the Xcode menu.
-> 그룹에 추가할 파일들을 선택한 후 XCode menu의 Section에서 File > New > group을 선택하면 group으로 묶을 수 있다.
Section 2
Create the Row View
The first view you’ll build in this tutorial is a row for displaying details about each landmark. This row view stores information in a property for the landmark it displays, so that one view can display any landmark. Later, you’ll combine multiple rows into a list of landmarks.
-> 이번 튜토리얼에서 가장 처음 만들 뷰는 각각의 landmark에 대해 detail을 보여줄 row 이다. 이 row view는 보여줄 landmark에 대한 property 에 들어있는 정보를 저장한다. 그래서 하나의 뷰는 어떤 landmark라도 보여줄 수 있다. 이후에는 landmark list를 multiple row들과 결합할 것이다.
*참고 : 그냥 view에 landmark 데이터를 뿌려준단 소리임
Step 1
Create a new SwiftUI view in the Views group named LandmarkRow.swift.
-> Views 그룹에 LandmarkRow라는 이름의 SwiftUI 파일을 새롭게 생성하라
Step 2
If the preview isn’t visible already, show the canvas by choosing Editor > Canvas, and then click Resume.
-> 만약 preview가 보이지 않는다면, Editor > Canvas를 들어가서 Resume 버튼을 클릭하라
Step 3
Add landmark as a stored property of LandmarkRow.
When you add the landmark property, the preview stops working, because the LandmarkRow type needs a landmark instance during initialization.
-> landmark를 LandmarkRow의 stored property로 추가하라
landmark property를 추가할 때, Landmark Row는 landmark 인스턴스를 초기화시켜야 하기에 preview는 작동을 멈춘다.
| To fix the preview, you’ll need to modify the preview provider. -> preview를 고치기 위해선, preview provider를 수정해야 한다 |
Step 4
In the previews static property of LandmarkRow_Previews, add the landmark parameter to the LandmarkRow initializer, specifying the first element of the landmarks array.
The preview displays the text, “Hello, World!”.
-> LandmarkRow_Previews의 previews라는 이름의 static property 내부에, landmarks 배열의 첫번째 element인 LandmarkRow를 초기화시키기 위한 landmark parameter를 추가하라
preview는 "Hello, World!" 라는 text를 보여준다
*참고 : landmarks[0] 에서 "[]"는 Subscript 문법이라고 한다. 일단 이 문법은 배열에서 특정 element에 접근 가능하다라는 것만 알고 있어도 된다.
Step 5
Embed the existing text view in an HStack.
-> 기존의 textView를 HStack으로 묶어라
Step 6
Modify the text view to use the landmark property’s name.
-> landmark property의 name을 사용하기 위해 text view를 수정하라
*참고 : 특정 구조체나 class의 property를 사용하기 위해선 초기화(initialize)를 통해 인스턴스나 객체를 생성 후 .property와 같이 접근이 가능하다.
이 예제에서는 preview에서 landmark에 landmarks[0]으로 초기화를 해놓았기 때문에 View의 text에서 landmark.name에 접근이 가능한 것이다.
Step 7
Complete the row by adding an image before the text view, and a spacer after it.
-> text view 위에 image를 추가함으로서 row를 완성하고 text view 아래에 spacer를 넣어라
*참고 : Image 뷰를 통해 landmark.image로 하지 않은 이유는 이미 landmark.image의 자료형이 Image 이기 때문에 그냥 landmark.image라고 해도 상관없는 것이다.
그리고 resizable()은 Image의 크기를 변경하고자 한다면 무조건 넣어주어야 한다.
Section 3
Customize the Row Preview
Xcode’s canvas automatically recognizes and displays any type in the current editor that conforms to the PreviewProvider protocol. A preview provider returns one or more views, with options to configure the size and device.
You can customize the returned content from a preview provider to render exactly the previews that are most helpful to you.
-> XCode의 canvas는 PreviewProvider 프로토콜을 준수하는 현재 editor 내부의 어떤 타입이던지 자동적으로 인식하고 보여준다. preview provider는 size와 device를 설정하는 옵션과 함께 하나 이상의 view들을 return한다.
우린 preview provider를 통하여 어떤 컨텐츠가 보여질지 사용자에게 가장 도움이 되도록 커스터 마이징이 정확하게 가능하다
Step 1
In LandmarkRow_Previews, update the landmark parameter to be the second element in the landmarks array.
The preview immediately changes to show the second sample landmark instead of the first.
-> LandmarkRow_Previews 에선 landmarks 배열의 두번째 원소를 업데이트 하라. preview는 즉시 첫번째 대신 두 번째 샘플 landmark로 변경하여 보여줄 것이다.
*참고 : 두 번째 원소를 보여주는데 왜 1을 넣었냐에 대한 궁금증이 있으실 수도 있으신데요, Swift에서 index는 0부터 시작을 합니다. 우리가 흔히 숫자를 셀때 1부터 사용하잖아요? 근데 컴퓨터는 0부터 읽어요. 그래서 우리가 사용하는 첫 번째는 컴퓨터에겐 0, 우리의 2 번째는 컴퓨터에겐 1이 되는 겁니다. 이거 착각하시면 안되용
Step 2
Use the previewLayout(_:) modifier to set a size that approximates a row in a list.
-> 리스트 내의 row에 적합한 사이즈를 세팅하는 previewLayout(_:) modifier를 사용하라.
|
you can use a Group to return multiple previews from a preview provider. -> preview provider에서 다수의 preview들을 반환하고 싶으면 Group을 사용할 수 있다 |
Step 3
Wrap the returned row in a Group, and add the first row back again.
Group is a container for grouping view content. Xcode renders the group’s child views as separate previews in the canvas.
-> return 되는 row를 Group으로 감싸고, 다시 첫 번째 row를 추가하라
Group은 view content를 grouping하는 컨테이너이다. XCode는 canvas에서 group의 하위 view들을 각각 분리된 preview로 렌더링 한다.
Step 4
To simplify the code, move the previewLayout(_:) call to the outside of the group’s child declarations.
A view’s children inherit the view’s contextual settings, such as preview configurations.
-> 코드를 단순화하기 위해선, previewLayout(_:)를 group의 내부가 아닌 바깥에서 선언하라
group내의 child view들은 하위 view들은 preview 설정에서와 같이 상황별 설정을 상속한다. -> 그냥 group 외부에 선언하면 하위 view에 모두 적용된다는 뜻임.
| The code you write in a preview provider only changes what Xcode displays in the canvas. -> preview provider 내부에서 작성한 코드는 오직 canvas에서만 변화된 XCode의 보여짐이다. *참고 : 그냥 canvas에서만 적용된다는 소리임. |
Create the List of Landmarks
When you use SwiftUI’s List type, you can display a platform-specific list of views. The elements of the list can be static, like the child views of the stacks you’ve created so far, or dynamically generated. You can even mix static and dynamically generated views.
-> SwiftUI의 List 타입을 사용할때 우린 view들의 platform에 맞춰서 보여지게 할 수 있다. list의 요소들은 이전에 만든 stack들의 하위 view들과 같이 정적(=static)일 수도 있지만 동적(=dynamically)으로 설정할 수 있다. 물론, 정적, 동적으로 선언된 view들을 혼합하여 사용 가능하다.
Step 1
Create a new SwiftUI view in the Views group named LandmarkList.swift.
-> LandmarkList라는 이름의 SwiftUI 파일을 Views 그룹에 추가하라
Step 2
Replace the default Text view with a List, and provide LandmarkRow instances with the first two landmarks as the list’s children.
The preview shows the two landmarks rendered in a list style that’s appropriate for iOS.
-> 기본 Text view를 List로 바꾸고 list의 하위 뷰로 LandmarkRow 인스턴스의 1, 2번 landmarks를 제공하라
preview는 iOS에 적합한 list style의 list로 렌더링된 두 개의 landmarks를 보여줄 것이다.
Section 5
Make the List Dynamic
Instead of specifying a list’s elements individually, you can generate rows directly from a collection.
You can create a list that displays the elements of collection by passing your collection of data and a closure that provides a view for each element in the collection. The list transforms each element in the collection into a child view by using the supplied closure.
-> list의 elements들을 개별적으로 지정하는 대신 collection을 통해 직접적으로 row을 설정할 수 있다.
데이터 컬렉션을 전달하여 각 element에 대한 뷰를 제공하는 closure와 테이터 콜렉션을 표시하는 list를 만들 수 있다. 이 list는 collectin 내부의 각 요소들을 공급된 closure들을 사용하여 child view로 바꿔준다.
Step 1
Remove the two static landmark rows, and instead pass the model data’s landmarksarray to the List initializer.
-> 정적 landmark row를 지우고, List initializer에게 model data의 landmarksarray를 넘겨줘라.
|
*중요* Lists work with identifiable data. You can make your data identifiable in one of two ways: by passing along with your data a key path to a property that uniquely identifies each element, or by making your data type conform to the Identifiable protocol.
Lists는 identifiable data와 함께 작동한다. 우린 두가지 중 한가지 방법으로 당신의 data가 identifiable하게 만들 수 있다. 1. 데이터와 함께 각 element를 고유하게 식별하는 property에게 key path를 전달한다 2. data type이 identifiable 프로토콜을 채택하게한다. |
Step 2
Complete the dynamically-generated list by returning a LandmarkRow from the closure.
This creates one LandmarkRow for each element in the landmarks array.
-> closure에서 LandmarkRow를 반환함으로서 동적으로 설정되는 list를 완료하라
이것은 landmarks 배열 내부의 각 element 들에 대해 하나의 LandmarkRow를 만든다.
| Next, you’ll simplify the List code by adding Identifiable conformance to the Landmark type. -> 다음은 Landmark type에 Identifiable를 채택하게 함으로서 List 코드를 단순화 할 것 이다 |
Step 3
Switch to Landmark.swift and declare conformance to the Identifiable protocol.
The Landmark data already has the id property required by Identifiable protocol; you only need to add a property to decode it when reading the data.
-> Landmark.swift 파일기 Identifiable 프로토콜을 채택하도록 선언하라.
Landmark 데이터에 이미 Identifiable 프로토콜에서 필요한 id property가 이미 존재한다. 우린 데이터를 읽을때 데이터를 decode할 property만 추가해주면 된다.
Step 4
Switch back to LandmarkList.swift and remove the id parameter.
From now on, you’ll be able to use collections of Landmark elements directly.
-> 다시 LandmarkList.swift 파일로 돌아와서 id parameter를 지우자
지금부터, 우린 Landmark element들의 collection들을 직접적으로 사용가능하다.
*참고 : List의 initializer에서 id parameter를 사용하지 않고, 데이터 타입에서 Identifiable을 채택해서 List를 사용하려면 Identifiable을 채택한 데이터 타입 내부 property로 id property를 Int로 꼭! 선언해주어야 한다.
Section 6
Set Up Navigation Between List and Detail
The list renders properly, but you can’t tap an individual landmark to see that landmark’s detail page yet.
You add navigation capabilities to a list by embedding it in a NavigationView, and then nesting each row in a NavigationLink to set up a transtition to a destination view.
-> list는 적절하게 렌더링하지만, 우린 각각의 landmark를 tap하여도 아직 디테일 페이지를 볼 수 있지 않다. 우린 NavigationView 안에 list를 넣음으로서 list에 넣으면 navigation이 가능해지고, 반복되는 각각의 row는 destination view로의 전환을 위하여 NavigationLink 내부에 넣는다.
*참고 : 스유에서의 Navigation은 UIKit에서의 navigationViewController가 하는 역할과 같다라고 생각하면 된다. 다만, UIKit에서는 push로 넘어갔다면 여기서는 NavigationLink를 통해 이동이 가능하다.
*CS 개념 : 자료구조
-> 자료구조에는 Stack(=스유의 VStack 이런게 아님)이 대표적으로 있다. Stack은 가장 최근에 들어온 자료가 가장 먼저 나가게 되는 LIFO(=Last In First Out)의 형태를 가진다. 이의 대표적인 예로서, iOS는 navigation stack이 있다. navigation stack은 push, pop으로 이루어져 있는데 앱을 사용할 때 버튼을 클릭하면 오른쪽에서 왼쪽으로 슬라이드 되며 나오는 화면을 본적이 있을 것이다. 그것이 push다. 기존의 화면에서 슬라이드 되어 나온 화면이 기존 화면 위에 stack으로서 쌓이게 되는데 이를 push라고 부른다. 반대로 pop은 슬라이드 되어 나온 화면의 좌측 상단에 보면 < 와 함께 뒤로가기 버튼이 있는 것을 볼 수 있을 것이다. 이를 누르게 되면 슬라이드 된 화면이 다시 오른쪽으로 슬라이드 되며 사라지게 되는데 이것이 pop이다.
즉, push는 stack에 자료가 새롭게 추가되는 것을 의미하고, pop은 stack에 있는 자료가 사라지는 것을 의미한다.
그럼 LIFO는 무엇일까. stack에 새로 자료가 push 되어 들어오게 되면 기존의 있던 자료 위에 새롭게 쌓인다. 그런데 이 자료가 pop되어 다시 사라지게 되면 다시 기존의 있던 뷰가 보이게 된다. 이처럼 나중에 push 되었지만, 먼저 pop 될 수 있는 것을 LIFO라고 부른다.
*Stack과 반대로 Queue라는 자료구조도 있다. 이는 나중에 기회가 된다면 설명하겠다.
Step 1
Create a new SwiftUI view named LandmarkDetail.swift.
-> LandmarkDetail이라는 SwiftUI view를 새롭게 만들어라
Step 2
Copy the contents of the body property from ContentView into LandmarkDetail.
-> ContentView의 body property에 있던 컨텐츠들을 카피해서 LandmarkDetail 에 복사해라
Step 3
Change ContentView to instead display LandmarkList.
-> ContentView에서 LandmarkList가 보이도록 변경하라
Step 4
Embed the dynamically generated list of landmarks in a NavigationView.
-> landmark 리스트들이 동적으로 동작하도록 NavigatioonView에 집어넣어라
Step 5
Call the navigationTitle(_:) modifier method to set the title of the navigation bar when displaying the list.
-> list를 보여줄 때 navigation bar의 title을 설정할 수 있는 navigationTitle(_:) modifier 메소드를 호출하라
*참고 : navigationTitle(_:) modifier 메소드는 무조건 NavigationView 내부에 선언해야한다. 이유라 함은 NavigationView 내부에서 보여질 거라고 생각하면 될 것 같다.
Step 6
Inside the list’s closure, wrap the returned row in a NavigationLink, specifying the LandmarkDetail view as the destination.
-> list의 closure 내부에서, 반환될 row들을 NavigationLink로 감싸고 목적지로 LandmarkDetail view로 지정하라
Step 7
You can try out the navigation directly in the preview by switching to live mode. Click the Live Preview button and tap a landmark to visit the detail page.
-> preview를 한번 live 모드로 바꾸고 네비게이션을 시험삼아 해봐라. Live preview button을 클릭하고 detail page를 방문할 landmark를 눌러봐라
Pass Data into Child Views
The LandmarkDetail view still uses hard-coded details to show its landmark. Just like LandmarkRow, the LandmarkDetail type and the views it comprises need to use a landmark property as the source for their data.
Starting with the child views, you’ll convert CircleImage, MapView, and then LandmarkDetail to display data that’s passed in, rather than hard-coding each row.
-> LandmarkDetail view는 landmark를 보여주기 위해 하드코딩을 사용한다. LandmarkRow와 같이 LandmarkDetail 타입과 뷰들은 그들의 데이터를 위한 소스로서 landmark property를 사용해 구성할 필요가 있다.
하위 뷰 부터 시작해 CircleImage, MapView, LandmarkDetail에 하드 코딩이 아닌 데이터가 뿌려지도록 할 것이다.
*참고 : 하드코딩이란?
-> 데이터들을 가져오는 것이 아니라 직접 일일이 값을 지정해주는 것을 의미한다
Step 1
In CircleImage.swift, add a stored image property to CircleImage.
This is a common pattern when building views using SwiftUI. Your custom views will often wrap and encapsulate a series of modifiers for a particular view.
-> CircleImage.swift 파일에 CircleImage를 위한 image property를 추가하라
이는 SwiftUI를 사용하여 view를 생성할때 가장 흔하게 사용되는 패턴이다. 커스텀 뷰는 특정 뷰를 위한 일련의 modifier 들을 감싸고 캡슐화한다.
*참고 : 좀 더 말을 풀어보자면, 커스텀 뷰는 특정 뷰를 감싸고 특정 modifier를 포함하는 특징을 캡슐화 한다라고 한 것 같다.
Step 2
Update the preview provider to pass the image of Turtle Rock.
Even though you’ve fixed the preview logic, the preview fails to update because the build fails. The detail view, which instantiates a circle image, needs an input parameter as well.
-> Turtle Rock의 이미지를 보내줄 preview provider도 업데이트 하라.
preview 로직을 수정했더라도 빌드가 실패하기에 preview도 실패한다. circle image를 초기화하는 detail view는 parameter에 올바른 input 값이 필요하다
Step 3
In MapView.swift, add a coordinate property to MapView and update the preview provider to pass a fixed coordinate.
This change also affects the build because the detail view has a map view that needs the new parameter. You’ll fix the detail view soon.
-> MapView.swift 파일에서 MapView에 coordinate property를 추가하고 수정된 좌표를 preview provider에 넣고 업데이트 하라
detail view가 새롭게 매개변수를 필요로하는 map view를 가지고 있기 때문에 이 변화 또한 build에 영향을 준다. 곧 detail view를 수정할 것이다.
Step 4
Add a method that updates the region based on a coordinate value.
-> 좌표 값에 기초하여 region을 업데이트 하는 메소드를 추가하라
Step 5
Add an onAppear view modifier to the map that triggers a calculation of the region based on the current coordinate.
-> onAppear view modifier를 현재 좌표에 기초한 지역을 계산하는 map에 추가하라
*참고 : onAppear에 대해서도 따로 다룰 예정이지만, 내가 개인적으로 너무 좋아하는 modifier다. UIKit에서는 그냥 View만 reload 시키면 쉽겠다고 생각한 적이 어어어엄청 많았다. 근데 항상 viewDidLoad()나 viewWillAppear()에서 리로드를 시켜줘야하는 그런 서글픔...ㅜㅡㅜ 근데 스유에선 그냥 view 단위로 업데이트를 해주면 되니까... 이게 너무 좋다.
Step 6
In LandmarkDetail.swift, add a Landmark property to the LandmarkDetail type.
-> LandmarkDetail.swift 파일에서는 LandmarkDetail 타입에 Landmark property를 추가하라
Step 7
In LandmarkList.swift, pass the current landmark to the destination LandmarkDetail.
-> LandmarkList.swift는 현재 landmark를 목적지인 LandmarkDetail로 넘겨준다
Step 8
In the LandmarkDetail file, pass the required data to your custom types.
With all of the connections established, the preview begins working again.
-> LandmarkDetail 파일에서는, 당신의 커스텀 타입에 필요한 data들을 넘겨준다.
구축된 모든 연결들과 함께 preview는 다시 작동한다.
Step 9
Change the container from a VStack to a ScrollView so the user can scroll through the descriptive content, and delete the Spacer, which you no longer need.
-> container를 VStack 에서 ScrollView로 바꿔라. 그러면 유저는 컨텐츠를 스크롤 가능하다. 또 더 이상 필요없는 Spacer를 지워라
Step 10
Finally, call the navigationTitle(_:) modifier to give the navigation bar a title when showing the detail view, and the navigationBarTitleDisplayMode(_:) modifier to make the title appear inline.
The navigation changes only have an effect when the view is part of a navigation stack.
-> 최종적으로,detail view를 보여줄 때 navigation bar에 title을 먹일 navigationTitle(_:) modifier를 호출하고, title을 inline으로 보여줄 navigationBarTitleDisplayMoe(_:) modifier를 호출하라.
navigation 변화는 오직 navigation stack의 부분인 view일때 영향을 가진다
Step 11
Switch to the live preview to see the detail view show the correct landmarks when you navigate from the list.
-> list에서 detail view로 넘어갈때 올바른 landmark를 보여주는 보기 위해 live preview로 변경하라
Section 8
Generate Previews Dynamically
Next, you’ll add code to the LandmarkList_Previews preview provider to render previews of the list view at different device sizes. By default, previews render at the size of the device in the active scheme. You can change the preview device by calling the previewDevice(_:) modifier method.
-> 다음은 다른 디바이스 사이즈들에서 list view를 렌더링 하기 위해서 LandmarkList_Previews preview provider에 코드를 추가하자.
기본적으로 preview들은 active scheme 디바이스 사이즈에 맞추어 랜더링을 한다. 우린 previewDevice(_:) modifier method를 호출함으로서 preview device를 변경할 수 있다.
Step 1
Start by changing the current list preview to render at the size of an iPhone SE.
You can provide the name of any device as it appears in Xcode’s scheme menu.
-> 현재 iPhone SE 사이즈에서 렌더링하는 list preview를 변경해보자.
XCode's scheme 메뉴에서 드러난대로 어떤 디바이스든 제공가능하다.
Step 2
Within the list preview, embed the LandmarkList in a ForEach instance, using an array of device names as the data.
ForEach operates on collections the same way as the list, which means you can use it anywhere you can use a child view, such as in stacks, lists, groups, and more. When the elements of your data are simple value types — like the strings you’re using here — you can use \.self as key path to the identifier.
-> list preview 안에서 device 이름 들을 데이터 처럼 배열로 사용해서 ForEach 인스턴스 내부에 있는 LandmarkList를 포함한다.
ForEach는 stacks, lists, groups와 같은 child view를 사용할 수 있는 어느 곳에서든 list 와 같은 방법으로 collection에서 동작한다. 데이터의 element들이 여기서 사용하는 string과 같은 간단한 value 타입일 때 우린 "\.self"를 identifer에 넣을 key path로서 사용 가능하다.
*참고 : 여기서 말하는 Collections라는 것은 "배열(=Array), 딕셔너리(=Dictionary), 집합(=Set)"과 같은 자료형을 일컫는 말이다.
Step 3
Use the previewDisplayName(_:) modifier to add the device names as labels for the previews.
-> previewDisplayName(_:) modifier를 사용하여 device name을 preview의 label로 추가합니다.
*참고 : 이 modifier를 사용하면 preview에 device 이름이 뜸
Step 4
You can experiment with different devices to compare the renderings of your views, all from the canvas.
-> canvas에서 여러 장치를 실험하여 view들의 렌더링을 비교할 수 있다.
*배운 것 정리
1. 데이터를 동적으로 뿌려주는 법을 배움
2. 필요한 데이터를 얻기 위해 모델링 하는 법을 배움
3. ForEach, Navigation, List 등 여러 컴포넌트 사용법에 대해 배움
3-1. List는 id를 주는 법이 2개라는 것!
-> Identifiable 프로토콜 준수해서 property로 id를 설정하는 것과 List initializer의 parameter로 \.id를 key path로서 넘겨주는 것. 그럼 알아서 인식함.
3-2. ForEach는 String과 같은 간단한 자료형의 경우 identifier로 \.self 를 넘겨줘도 인식을 한다는 것.
*읽어주셔서 감사합니다! 피드백은 정신건강에 많은 도움이 됩니다*
참고 링크 :
developer.apple.com/tutorials/swiftui/building-lists-and-navigation
Apple Developer Documentation
developer.apple.com